
Take Home Kit Instructions
1. Materials Included
- Stoneware clay (cone 6 Mid Smooth Speckled clay)
- Sponge
- Rib or thumb tool
- Glaze
- Slip
- Paint brushes
- Scoring/molding tools
- Materials Needed: Water, any tools that will be useful (i.e. spoons, forks, bowls, molds, rolling pin, canvas, ruler, banding wheel)
2. Preparing Your Clay
- Your clay is pre-wedged and ready to use.
- Moisten as needed: Stoneware should be soft but not sticky. If it’s dry, add a little water and work it into the clay.
3. Choose Your Handbuilding Technique
Technique 1: Pinching (Pinch pot)
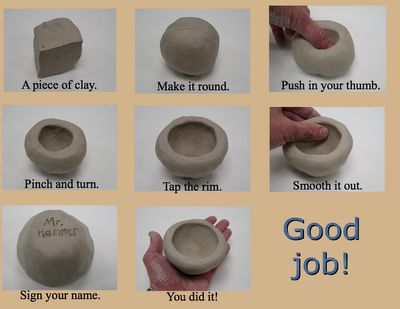
Ideal for small items like bowls, cups, or small sculptures.
Steps:
- Form a clay ball (~ the size of a lemon or orange).
- Press your thumb into the center, leaving about 1/2” at the bottom.
- Begin pinching the clay evenly between your thumb and fingers, rotating as you go.
- Continue shaping upward, thinning the walls gradually (aim for 1/4” thickness).
- Smooth the surface with fingers or damp sponge.
- Let it firm up to leather-hard before painting.
Technique 2: Slab Building
Perfect for boxes, trays, mugs, and angular or structured items.
Steps:
- Roll out clay into an even slab (~1/4” thick) using a rolling pin
- Let slabs rest briefly to firm up to leather-hard (less floppy).
- Cut shapes with a needle tool using templates or rulers.
- Score and slip edges before joining slabs.
- Use a rib or hands to compress and smooth seams.
- Reinforce corners from the inside if needed.
- Add details like texture, handles, or feet once the form is assembled.
Technique 3: Coiling
Great for larger items like vases, planters, or sculptural pieces.
Steps:
- Roll out long, even coils (about the thickness of your finger).
- Create a flat base (use a slab or pinch a circle).
- Score and slip the edge of the base where the first coil will go.
- Lay the first coil on top, press and blend it inward using fingers or tools.
- Add more coils, blending each one to the one below.
- Build up height gradually. Compress and smooth the inside as you go.
- For smoother walls, scrape the outside and inside with a rib tool.
- When finished, let it dry slowly under plastic to avoid cracking.
4. Drying and Finishing
- Let your piece dry slowly and evenly to avoid cracks.
- You can cover your piece in plastic if you plan to work on it again later.
5. Painting
- Paint your piece with the glazes provided. DO NOT use any regular paint or other glazes as this will lead to damage to your piece and/or the kiln.
- Coat your piece with 2-3 layers of glaze, letting it dry in between coats.
- You can mix glaze colours to achieve other colours.
- Do not paint the bottom of your piece or it will fuse to the kiln shelf
6. Bringing back to studio
- Once fully dry (bone dry) bring you item back to the Mud Shop for bisque and glaze firing. Make sure to put your email on the box provided.
- Transport items carefully
- Give reception your email to ensure you will be notified when your items are ready for pick up.
✅ Tips for Success
- Work in stages: don't rush drying or joining.
- Experiment with texture tools (leaves, stamps, fabrics).
- Do not paint the bottom of your pieces (it will have to be washed off because it will stick to the kiln shelf)
- Don’t add too much moisture to your piece. Reserve damp sponge for smoothing out pieces after they are set a little bit.
- If you feel stuck, look up tutorials. There are tons of great resources online!
ATTACHING THINGS:
When you attach two pieces of clay you must score the clay on BOTH sides and add slip. Slip acts as glue but it will not stick without scoring.